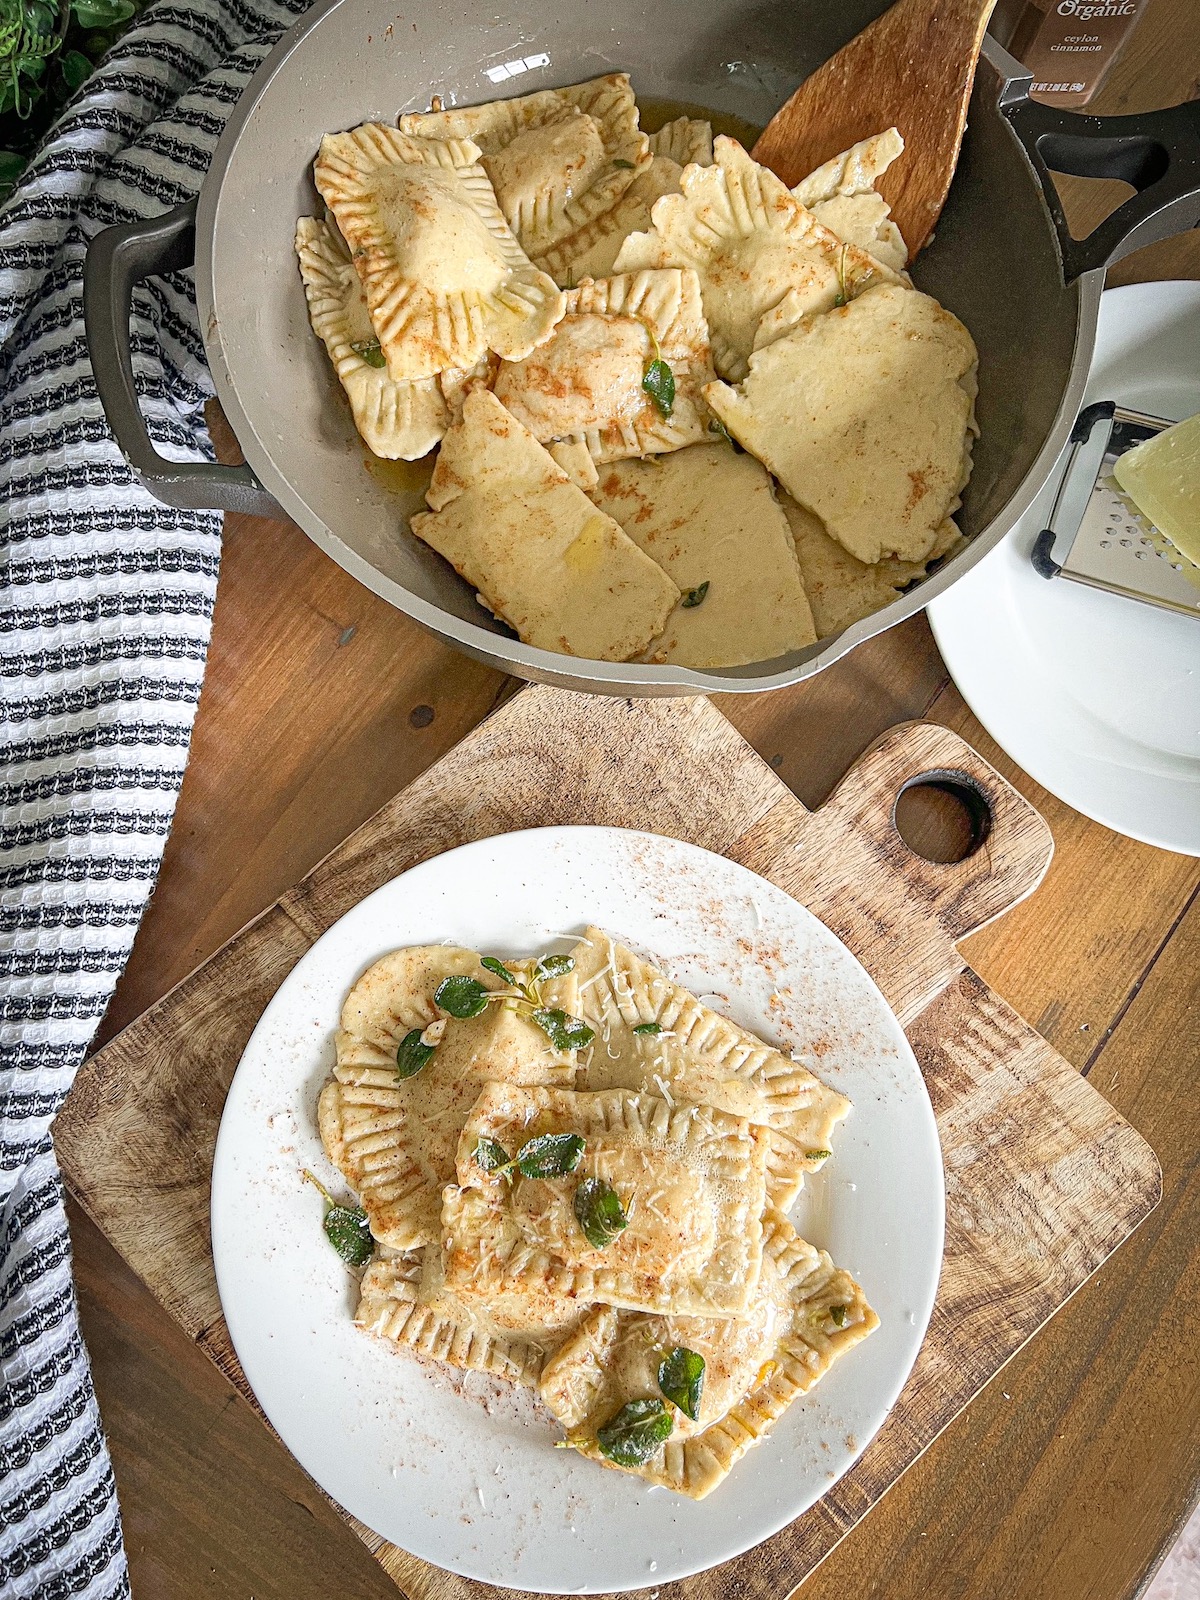
These Gluten-Free Butternut Squash Ravioli in Brown Butter Sage Sauce may seriously be the best things I’ve ever made. So much so, that I double batch so we can have more for Thanksgiving!
First of all, if you’ve never made ravioli from scratch you might think it’s impossible or expect a total disaster. I know I did. Oh don’t you worry – you’ll hear plenty in this post about the first time I made them, of me getting ready to climb up to the roof and take a swan dive, figuring it’d be easier to just end it all than try to finish this recipe.
BUT, I saved myself and kept on going. (Plus I realized my house isn’t high enough and I’d probably only just break something. That would suck.) But finishing this perfect-for-fall, fresh vegetarian recipe was worth it in the end. Oh, was it worth it in the end.
And now that I’ve worked out the kinks and streamlined the process, I love to make them, and make them all the time! You can do it too, and I am here to help.
This is a lengthy post, because I break it all down for you step-by-step with lots of FAQ’s at the end. But don’t let that intimidate you! I like details, and thought you might appreciate that here, too. Here we go!
Equipment Needed
If it’s your first time making homemade pasta, don’t worry – I will break it down for you. It’s easier than you think, and you don’t need a pasta maker (I don’t use one). You will, however, need a food processor or a stand mixer with the dough attachment. Outside of that, your usual kitchen staples will do.
Why This Recipe Works
For starters, this recipe is so savory and divine, and perfect for the season of fall. It’s filling enough that you don’t need to serve it with anything else, but light enough, since it’s gluten-free, that you don’t feel like a load later on.
Don’t let the number of steps fool you because it’s actually fairly easy to put together. The brown butter sage sauce is maybe the quickest, tastiest sauce I ever made, and I guarantee you’ll want to use it on other recipes in the future.
And the deliciously flavorful butternut squash ravioli filling? You’ll whip it up in no time. I will hold your hand and make sure you don’t jump. We’ll be fine, I promise. Here we go.
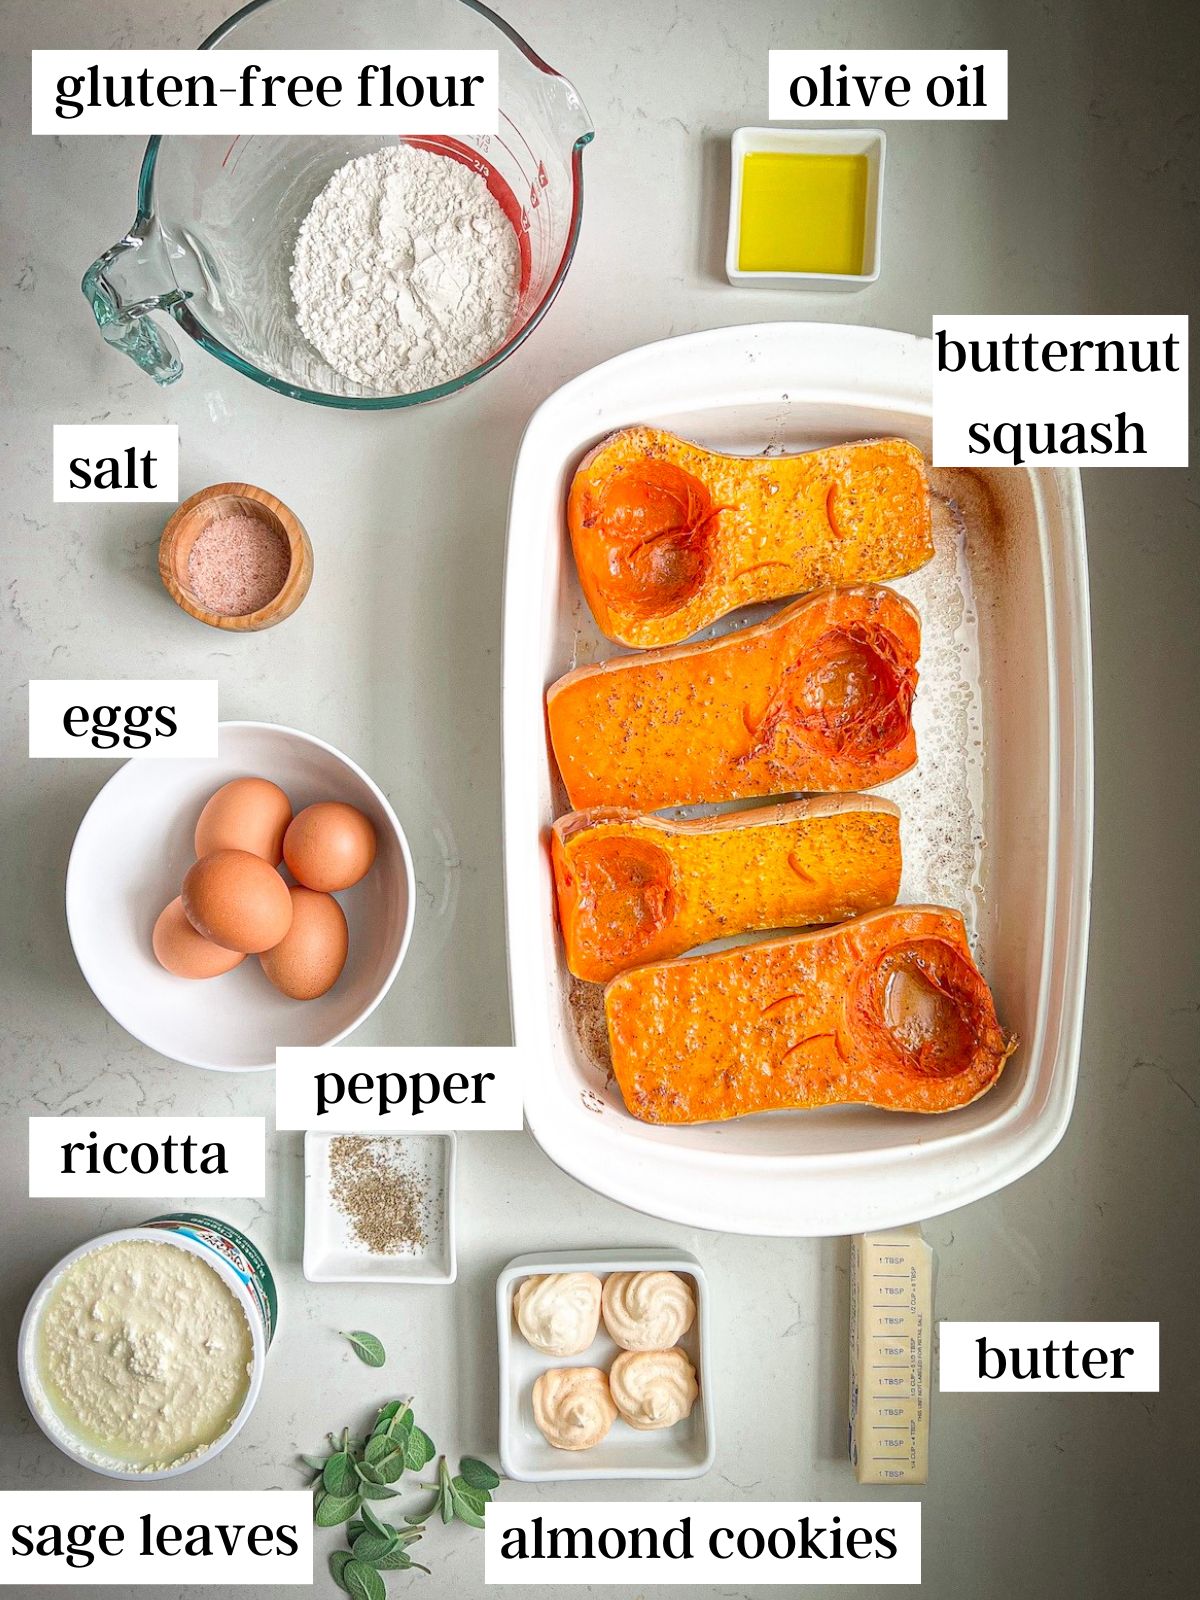
Ingredients for Gluten-Free Butternut Squash Ravioli
For the pasta:
- 4 eggs (+1 for egg wash)
- gluten-free flour (here’s my favorite brand)
- salt and pepper
- drop of extra virgin olive oil
For the butternut squash filling:
- 2 small or medium sized butternut squash
- 1 15 oz container of fresh ricotta (or dairy-free ricotta, like my 2-ingredient cashew ricotta)
- 4 gluten-free almond cookies, almond meringues, or amaretti cookies
For the brown butter sage sauce:
- 1 stick butter (or ghee; if you need it truly dairy-free, use 1/2 cup olive oil)
- a handful of fresh sage leaves
How to Make Butternut Squash Ravioli with Brown Butter Sage Sauce
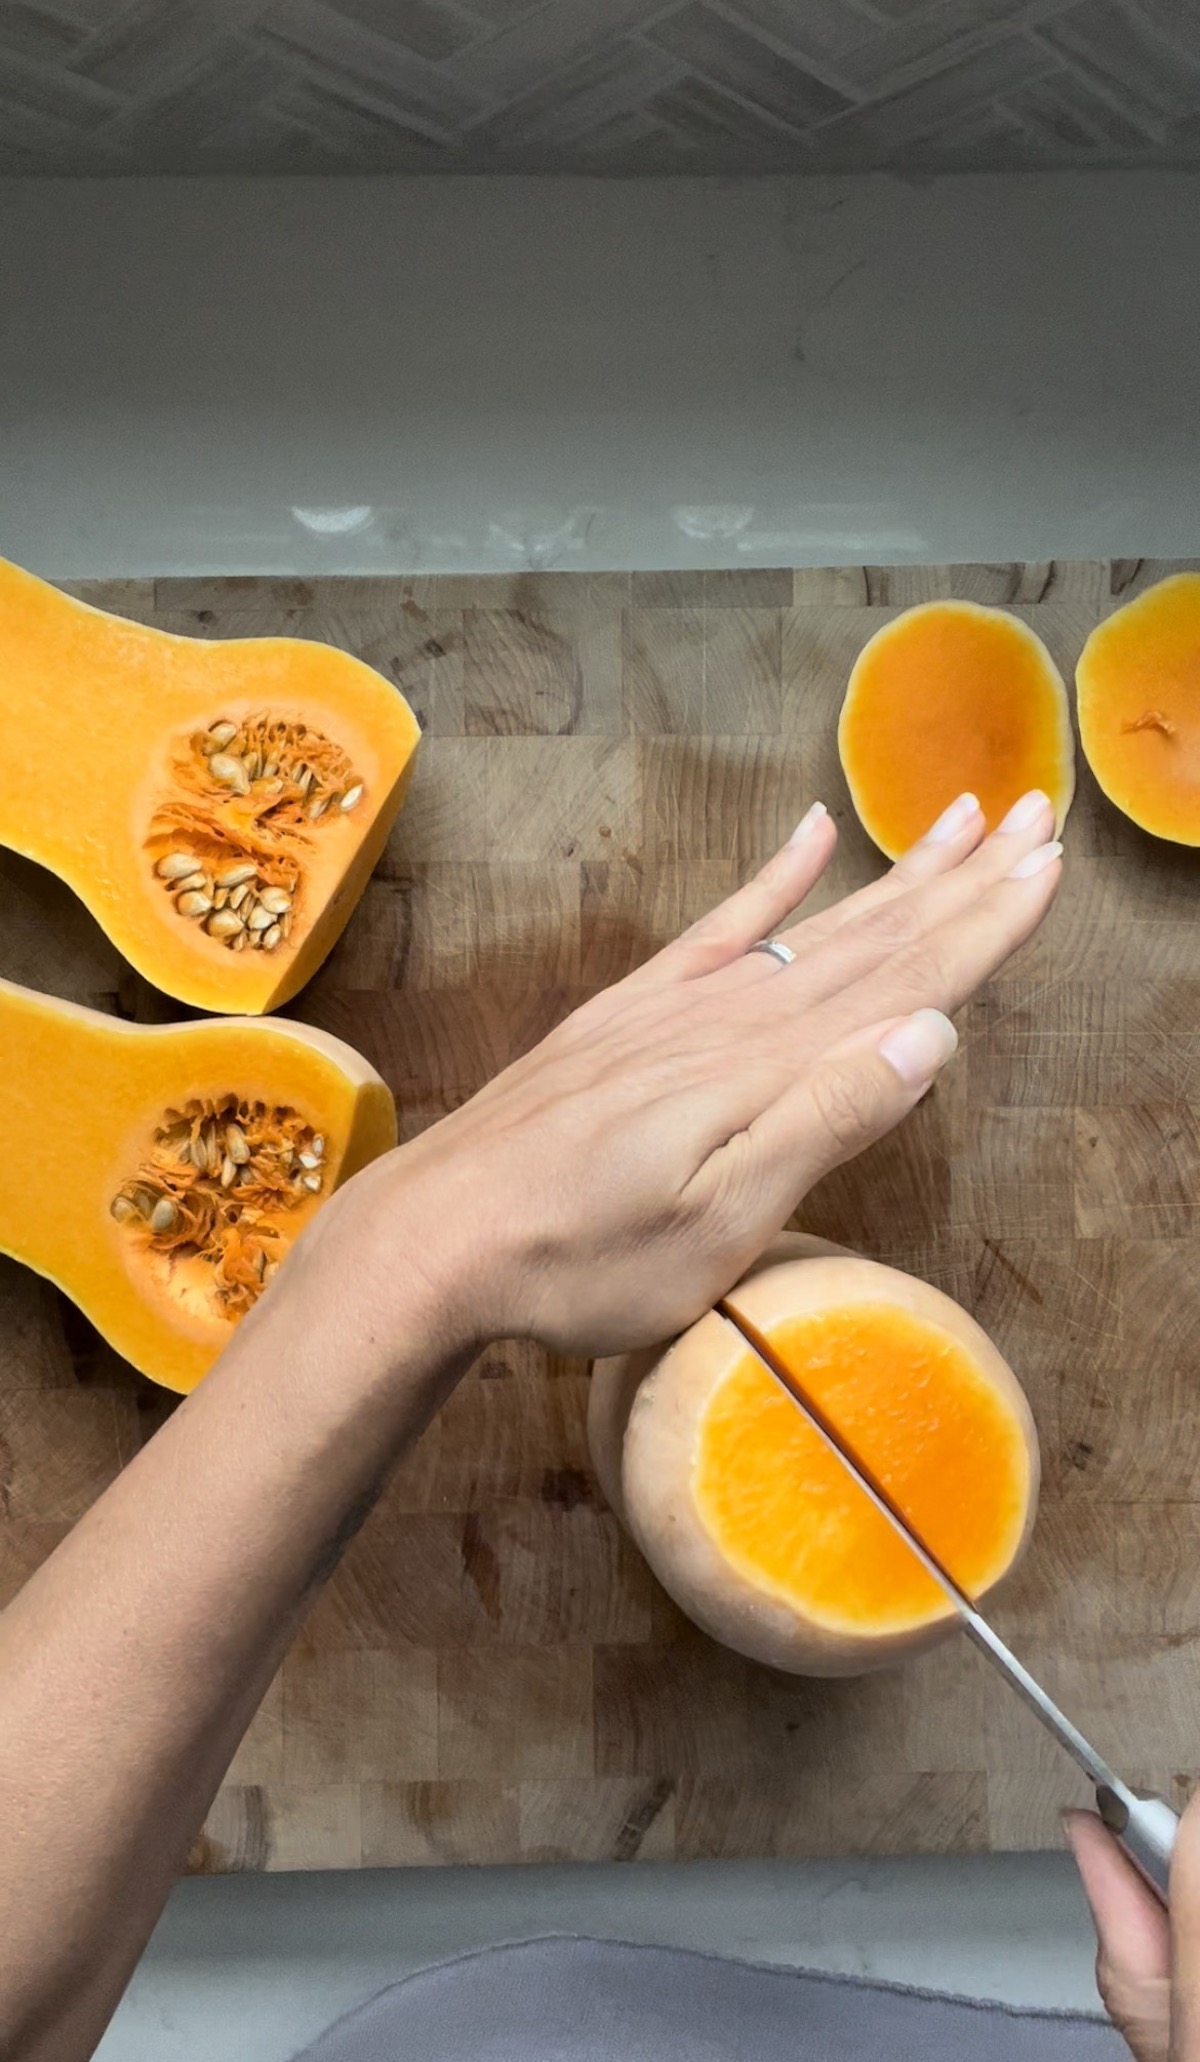
Step 1: Preheat your oven to 350 degrees. Now, prepare your butternut squash. Cut off the very top and bottom parts of your butternut squash to give it a flat surface. Then stand it up, and begin to cut it right down the middle to get two halves.
(*Tip: cutting winter squash can be quite a workout, because some of them are very hard. One of my readers claims she inserts her knife, then uses a hammer to gently tap the knife down through the squash.)
Also, here’s a pic of the first time I made this, when Penelope was a baby. I put the top of the butternut on her head to make a tiny hat for my little sous chef 🙂 Look at that face!

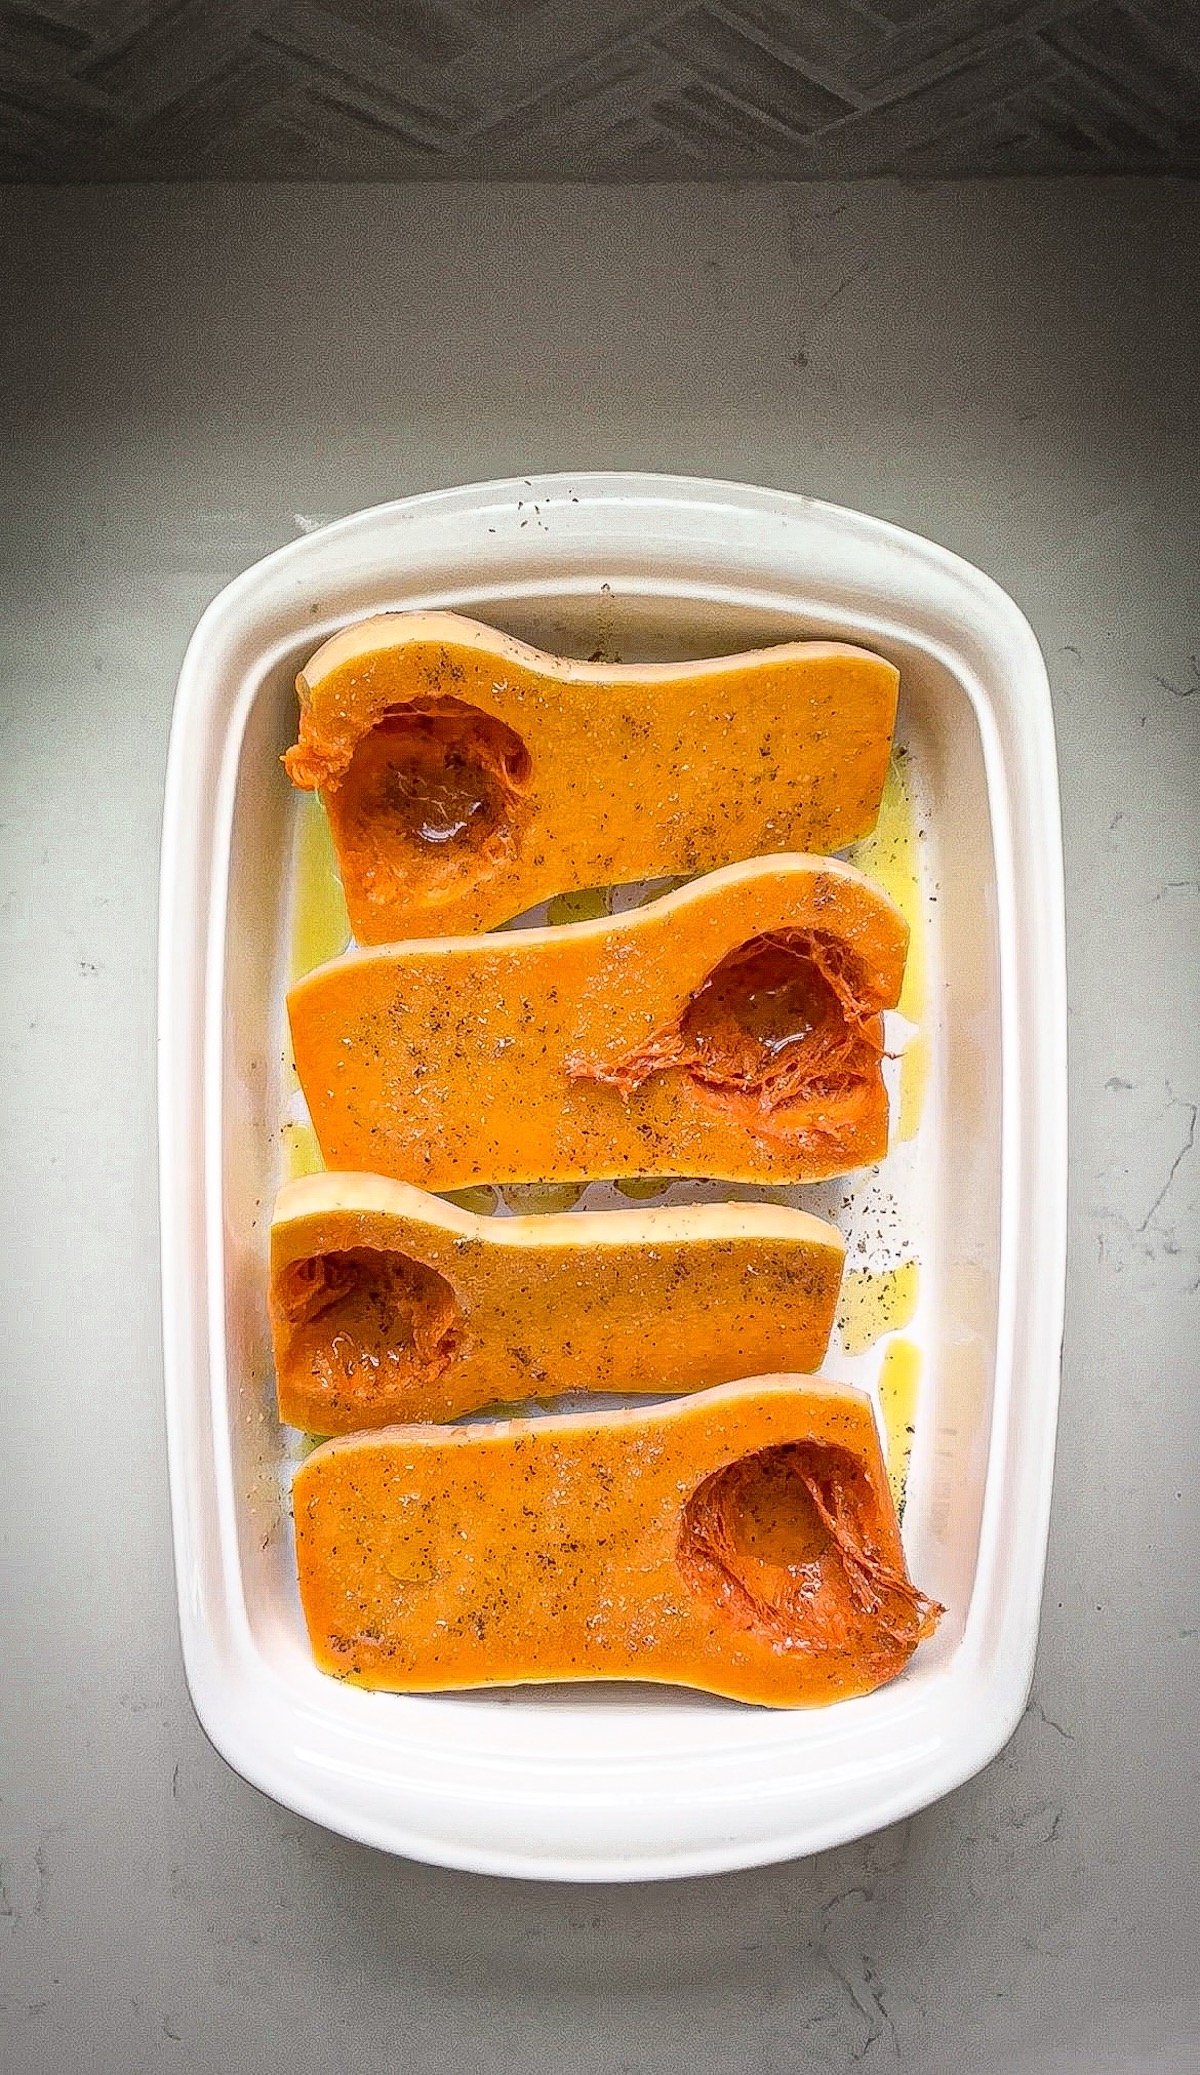
Step 2: Now we are going to get ready to bake your butternuts. Using a spoon, scoop out the seeds from the centers. Next, lay them all face up on a cooking sheet or in a casserole dish, and lightly season with salt and pepper. Drizzle with extra virgin olive oil and bake for 45-55 minutes, then set aside and allow to cool. You’ll know they are done when you can go right through them with your spoon.
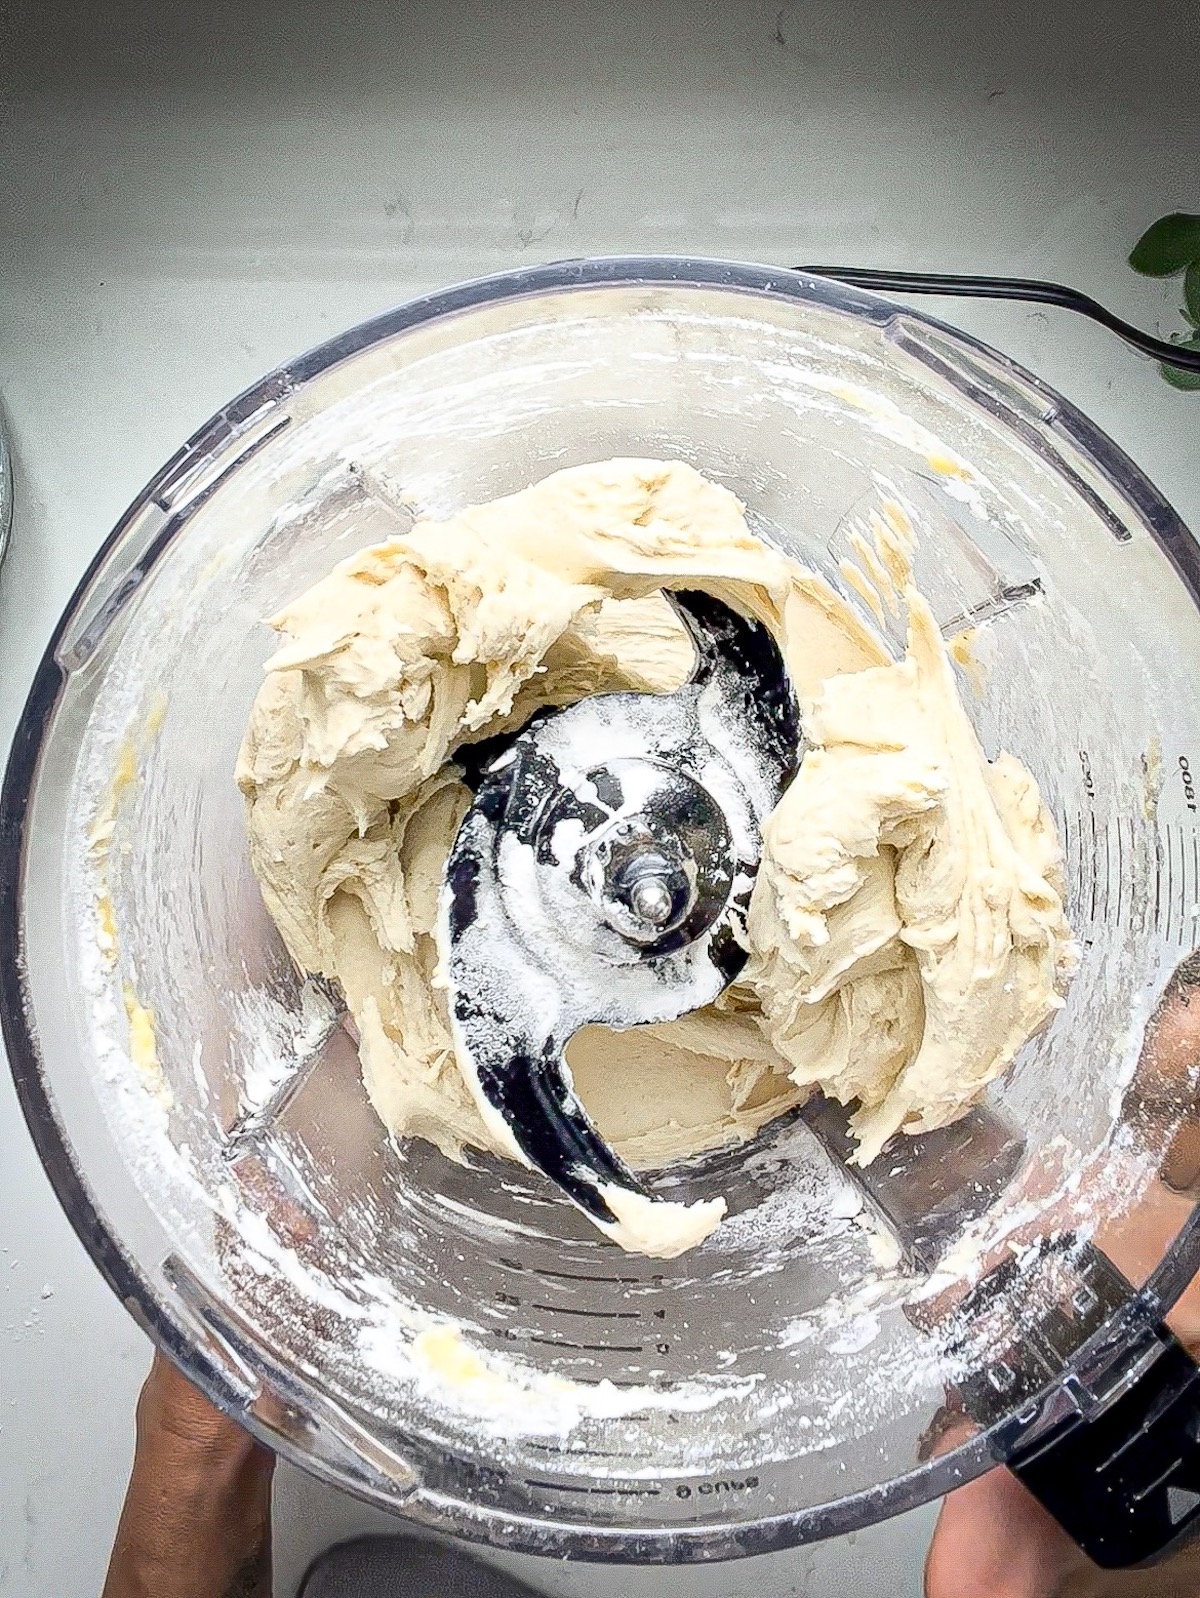
Step 3: While your squash is baking, it’s time to make your fresh homemade ravioli dough. Crack your 4 eggs into the food processor, and add the flour. Use a dough blade if your processor came with one (if not, don’t worry, the regular blade will do). Add a pinch of salt and pepper and a drizzle of olive oil, and process for about 30 seconds.
Turn the processor off and check the dough by squeezing it. If it sticks to your hands, you need more flour. Add 3 more spoonfuls of flour and blend again for 30 seconds. By this point your dough may have formed a ball in the food processor, and when you touch it now, it shouldn’t stick to your hands. Once you get to this stage, your dough is ready.
Step 4: Lightly dust a clean surface with flour. (Keep the flour close by so you can add a little if necessary.) Break your dough apart and shape it into 6 rounds, like this:
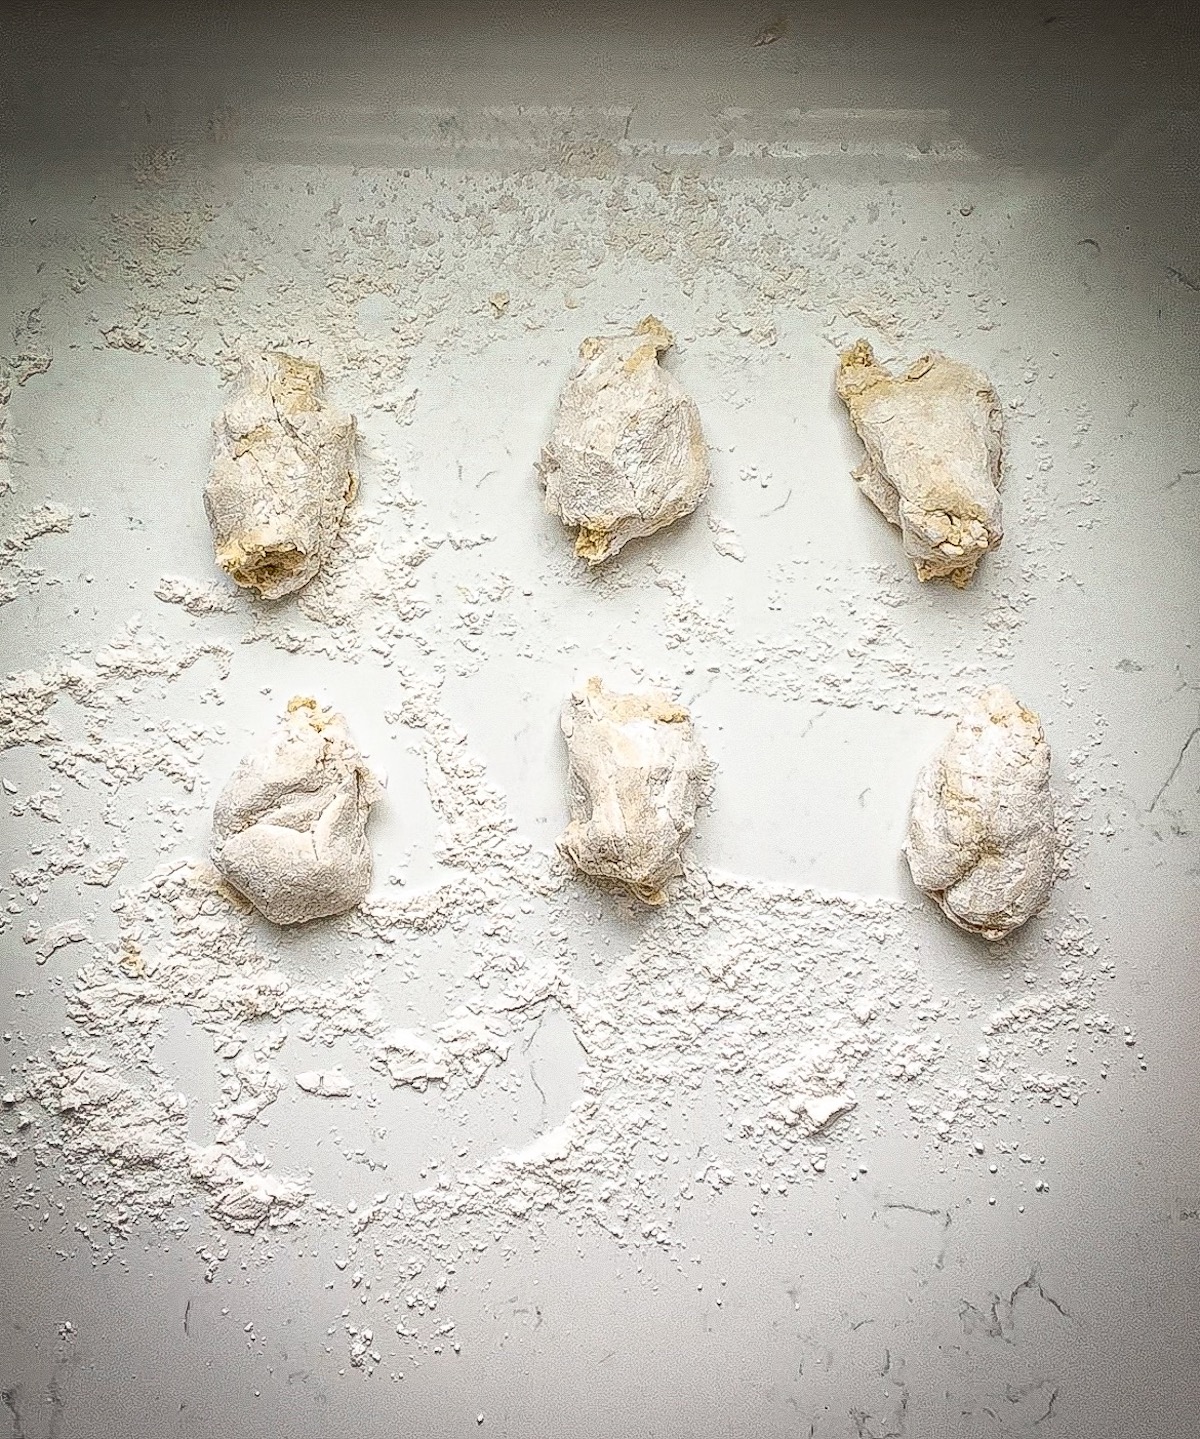
Take one of the rounds and work it into an oblong shape, then use a rolling pin to roll up and down the dough until you get a nice strip, about 12-15 inches in length and about 3 inches wide. Set aside, and repeat this process with each of the other dough balls.
If the rolling pin sticks to the dough, add a tiny bit of flour as necessary. Your dough strips certainly don’t have to be perfect.
Tip: To prevent the dough from drying/cracking after you roll it out into the strips, I like to use slightly damp paper towels or a kitchen towel, and stack the strips in between.
Step 5: By now your butternut squash should be cooled down a bit, so you can prepare your filling. Scoop out the soft flesh of the squash and place in a large bowl. Then add a pinch of salt, a pinch of pepper, the ricotta (regular or dairy-free), and the crushed cookies (you can crumble the cookies with your hands). Mix all ingredients together with a spoon.
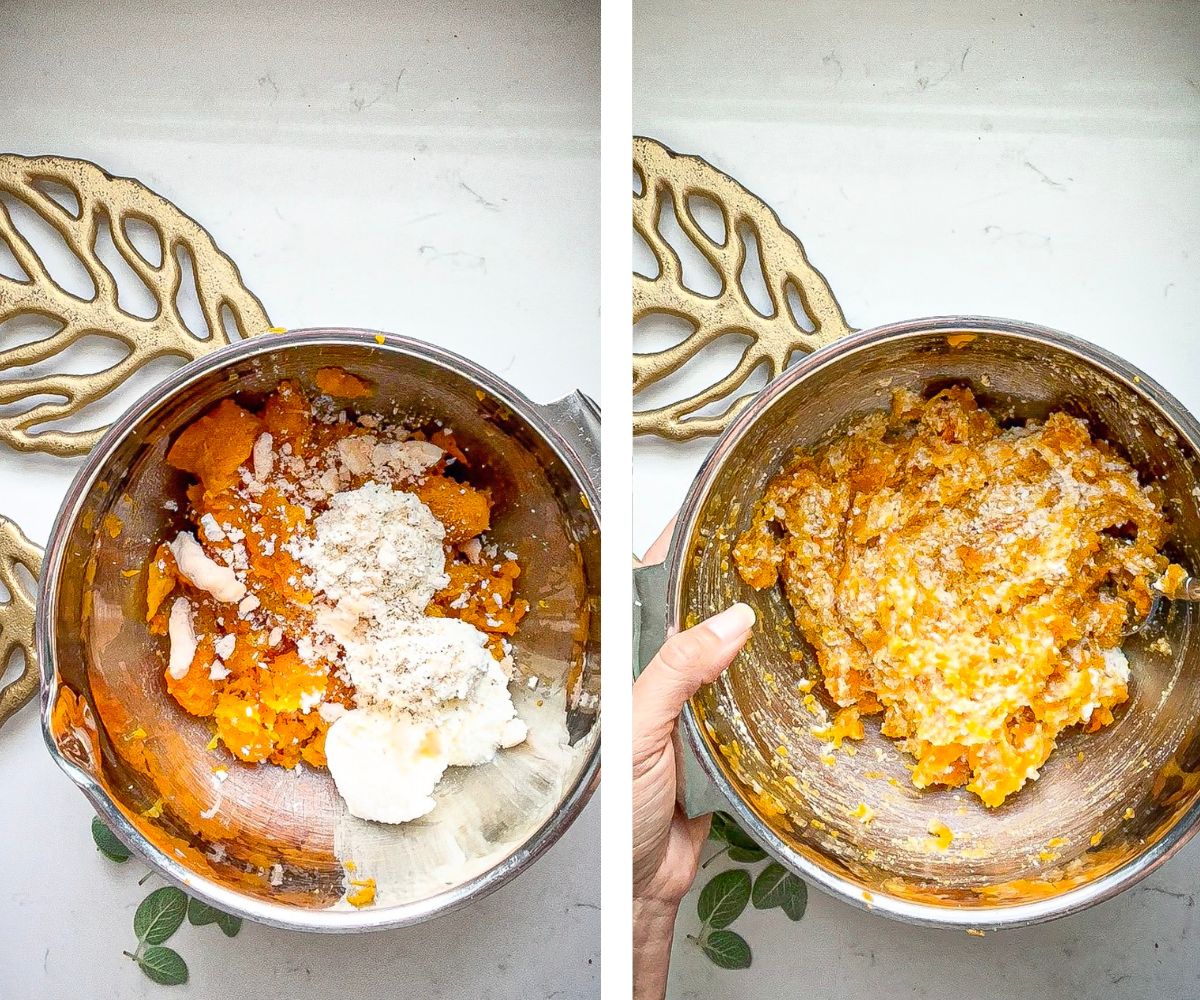
Tip: I made my own almond meringue cookies, but you can use gluten-free ginger snaps, like these, which will give you a similar flavor.
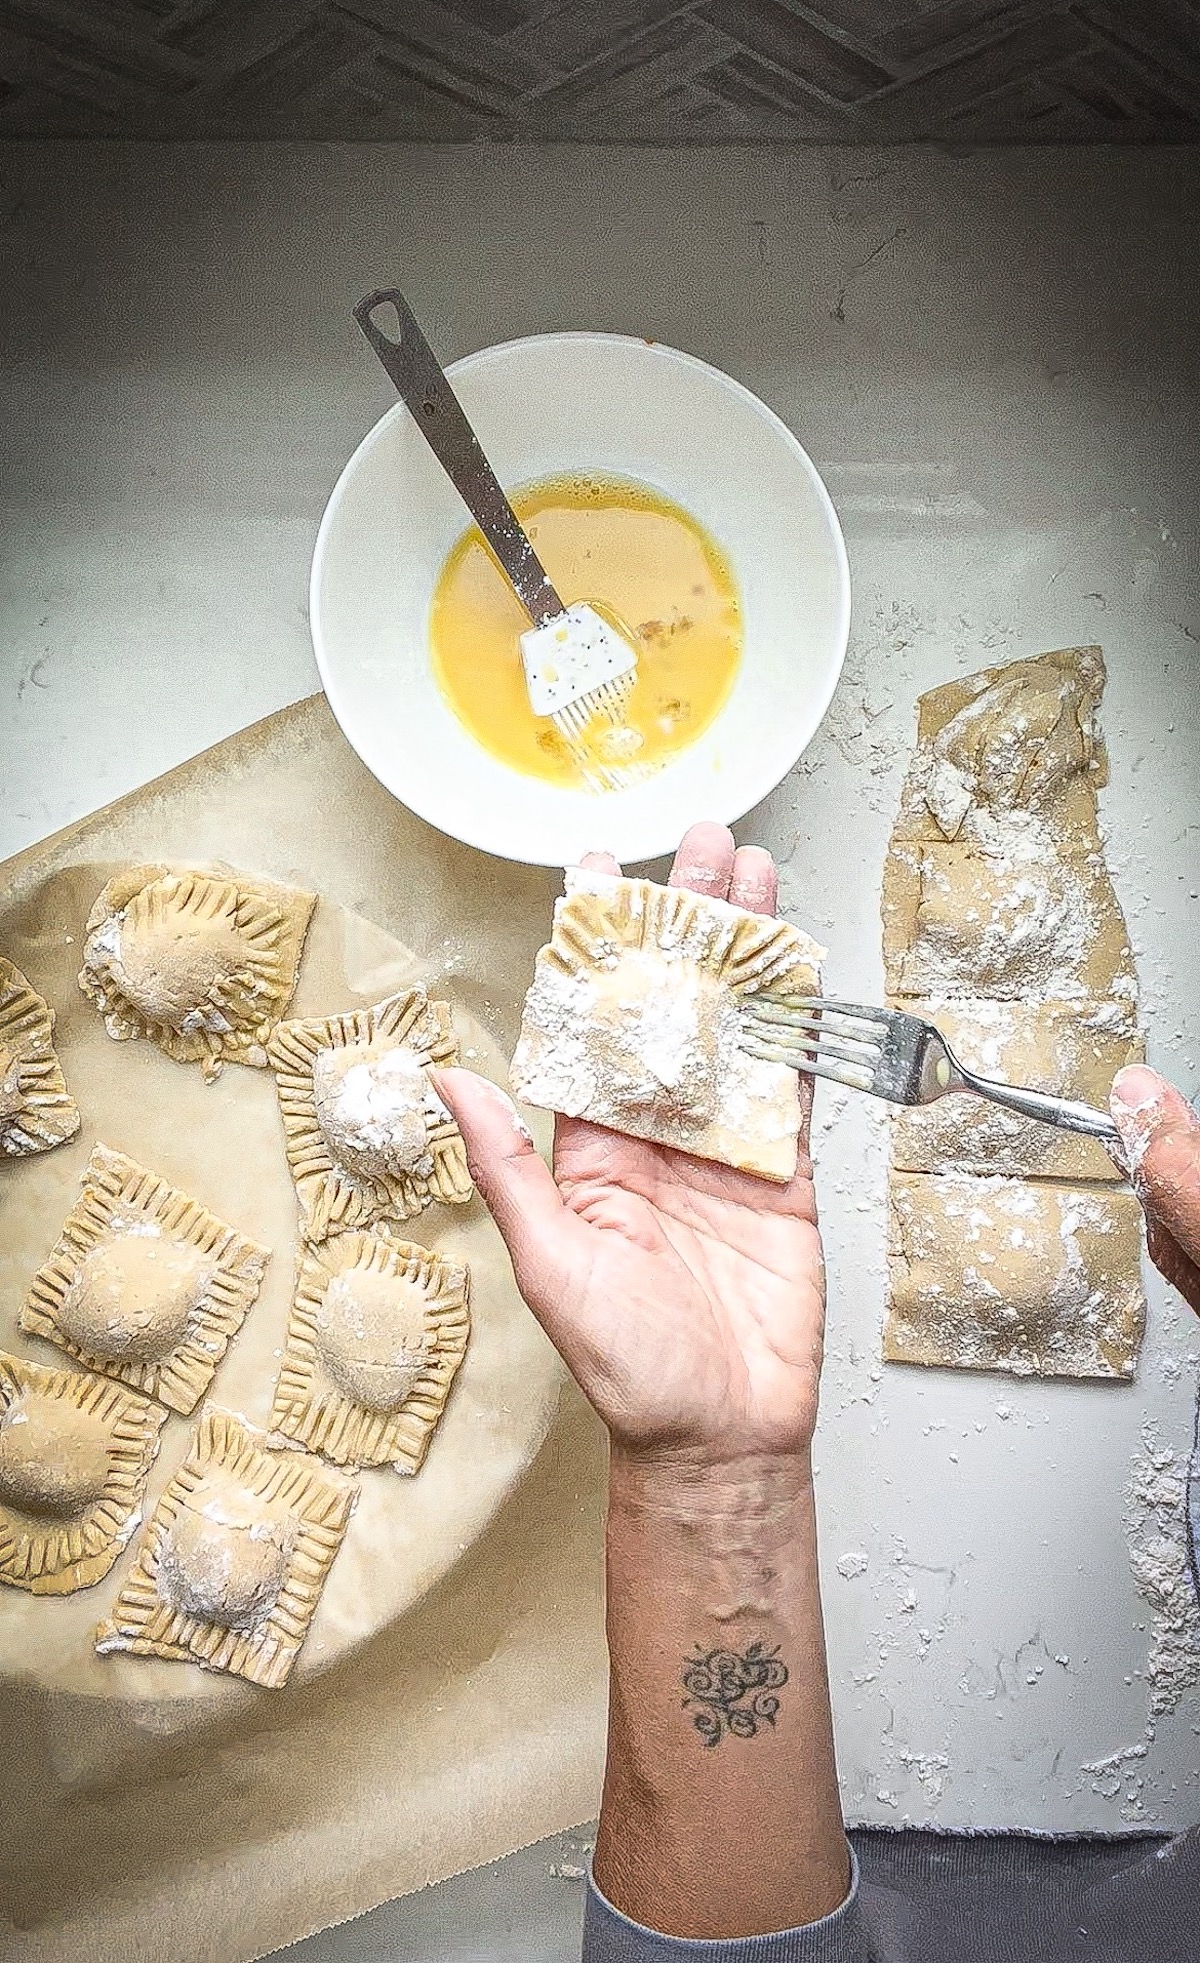
Step 6: Next, fill a medium-sized pot with water and place it on the stove over medium heat. While your water is boiling, get ready to fill your raviolis. Lay one of your dough strips onto the surface of your workspace. Use a pastry brush to brush the egg wash onto the strip.
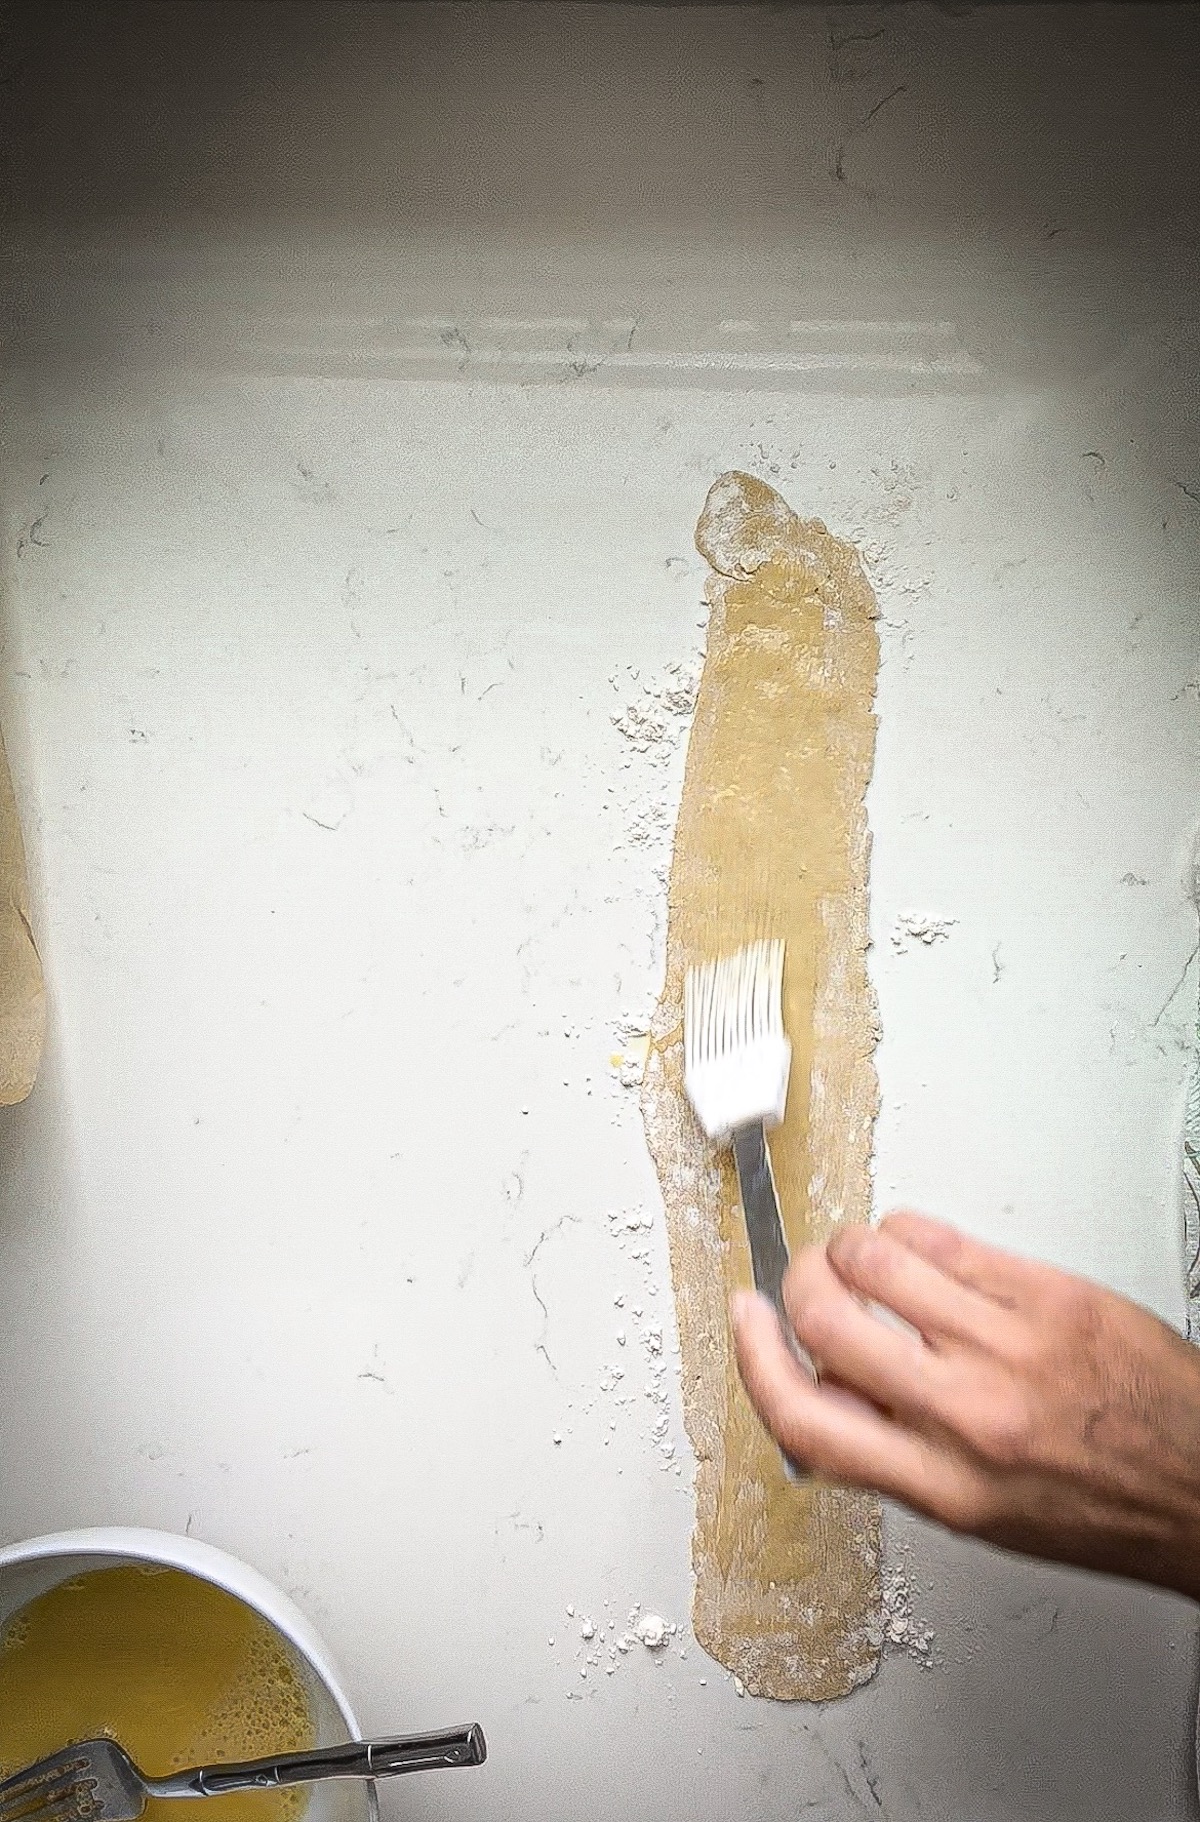
Begin to spoon filling by the teaspoon down the strip, leaving about 1 inch in between. (You should get about 6 teaspoons onto the strip.) Then, cover evenly with another strip of dough, pressing down gently in between the fillings.
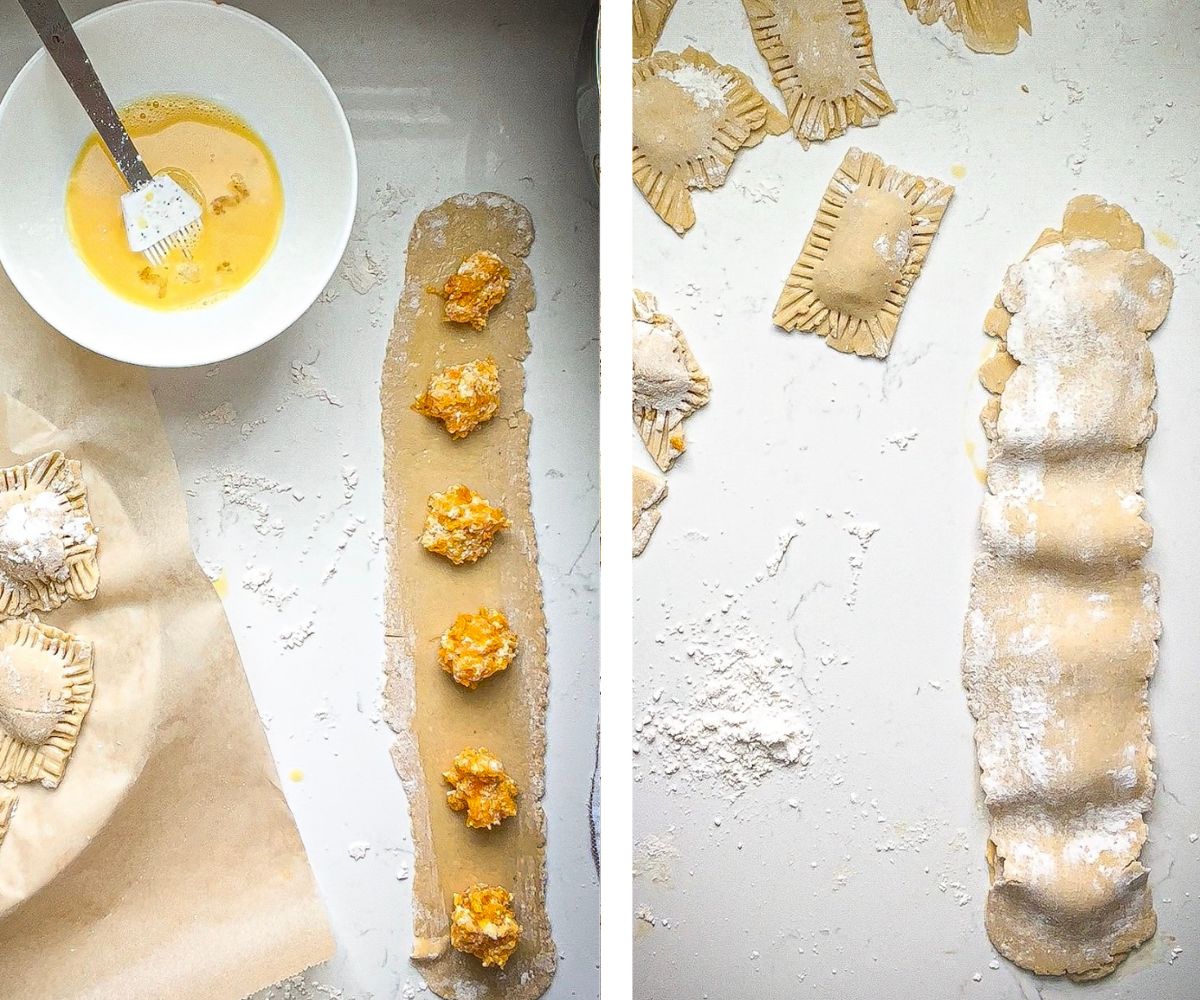
Step 7: Gently sprinkle a bit more flour to the top, then use a pizza cutter to separate your ravioli. Repeat with other strips until you are out of dough.
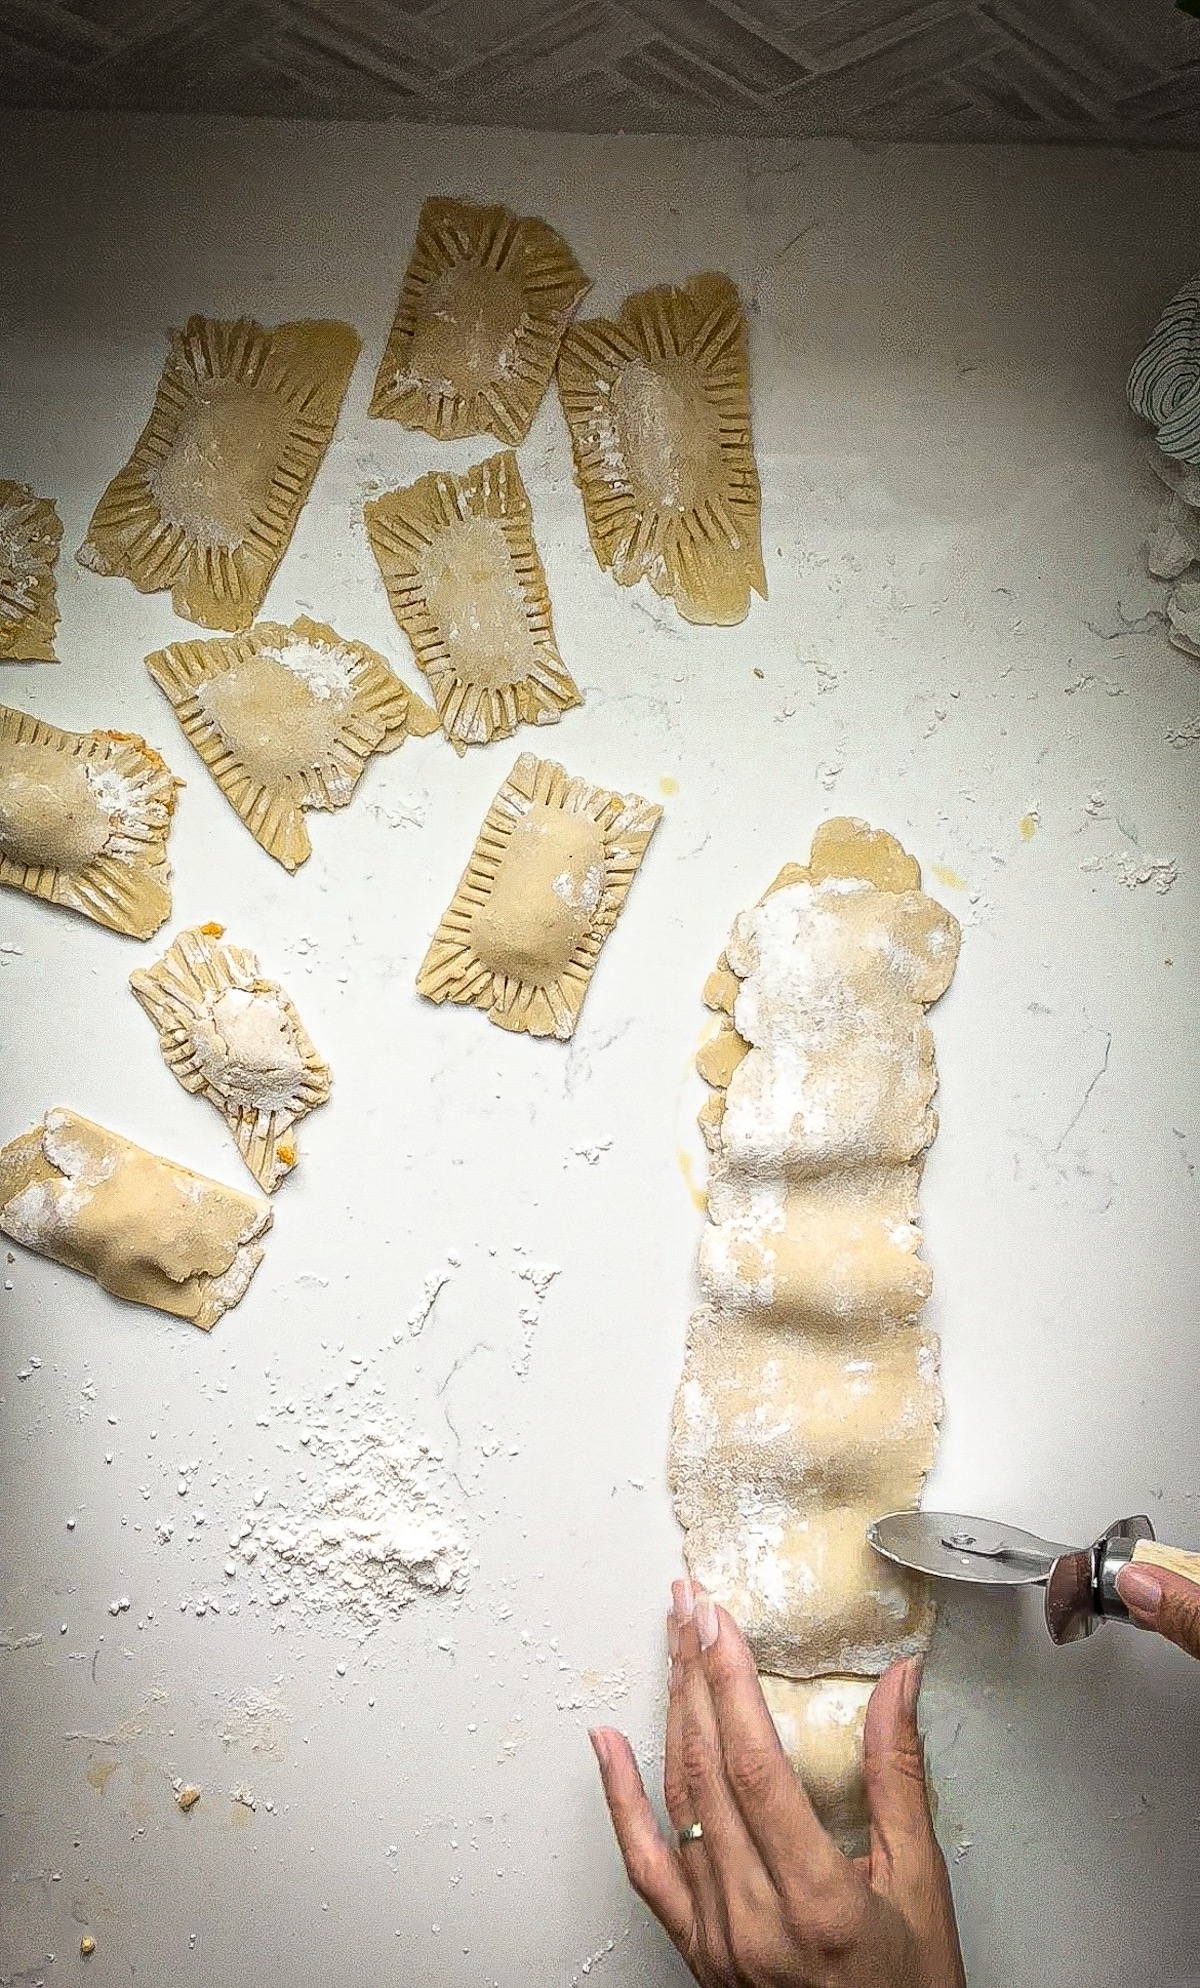
Step 8: Using a fork, begin to “pinch” down the sides of the ravioli, all the way around, to “seal” them. As you can see, mine are not perfectly uniform! They don’t need to be. We don’t live in a perfect world, so your ravioli don’t need to be perfect, either 😉
Mine were still very soft at this point, which had me worried. I had visions of them exploding open as I dropped them into the boiling water, crumbling into a giant pot of mush, which once again made my roof sound like a good idea. But instead I put them on a plate and stuck them in the fridge for 20 minutes to see if they would harden a bit. They did, and by the time my water started boiling, they were perfect.
Alternatively, you can place them in the freezer and freeze for 10 minutes.
Step 9: Now it’s time to make your sauce. Place a skillet over medium-high heat and add your butter. After about 5 minutes, you will begin to see golden-brown flecks in the butter (note: if using ghee or olive oil, you will not see the brown flecks, so just heat for 5 minutes). Turn off the heat and immediately add your sage leaves, which should crisp up nicely.

Step 10: Your water should be boiling, so now comes the moment of truth: time to cook your raviolis. If you are still with me, don’t worry – you’re in the home stretch. You can do this! Begin to drop your ravioli into the boiling water and gently stir with a wooden spoon, careful not to break them.
They won’t take long to cook so don’t go doing anything crazy like watching your show or doing laundry or anything. Stay on top of these suckers, and the minute they start to float (about 3-5 minutes), GET THEM OUT of the water with a slotted spoon and place them right into your brown butter sage sauce (see note if using ghee).
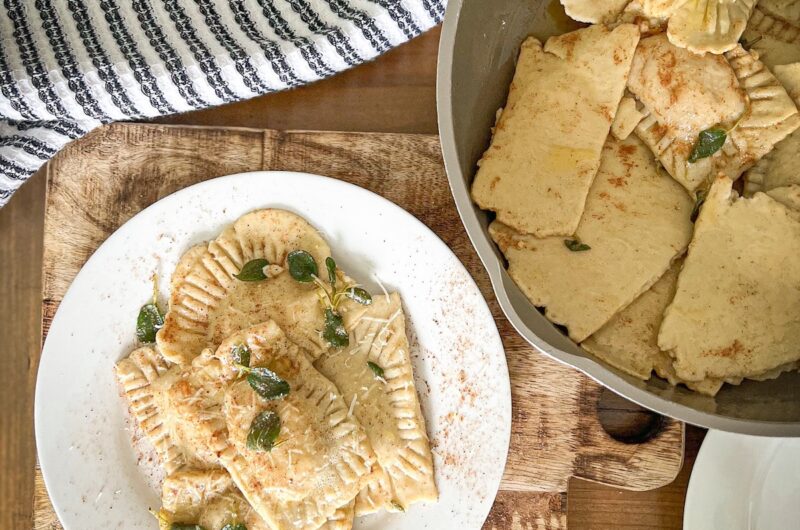
Carefully toss with the wooden spoon until the ravioli are coated with the sauce. Then plate them, and top some grated parmesan or Pecorino Romano cheese on top, sprinkle a bit of cinnamon and/or nutmeg (optional), and voila! You did it! Buon appetito 🙂
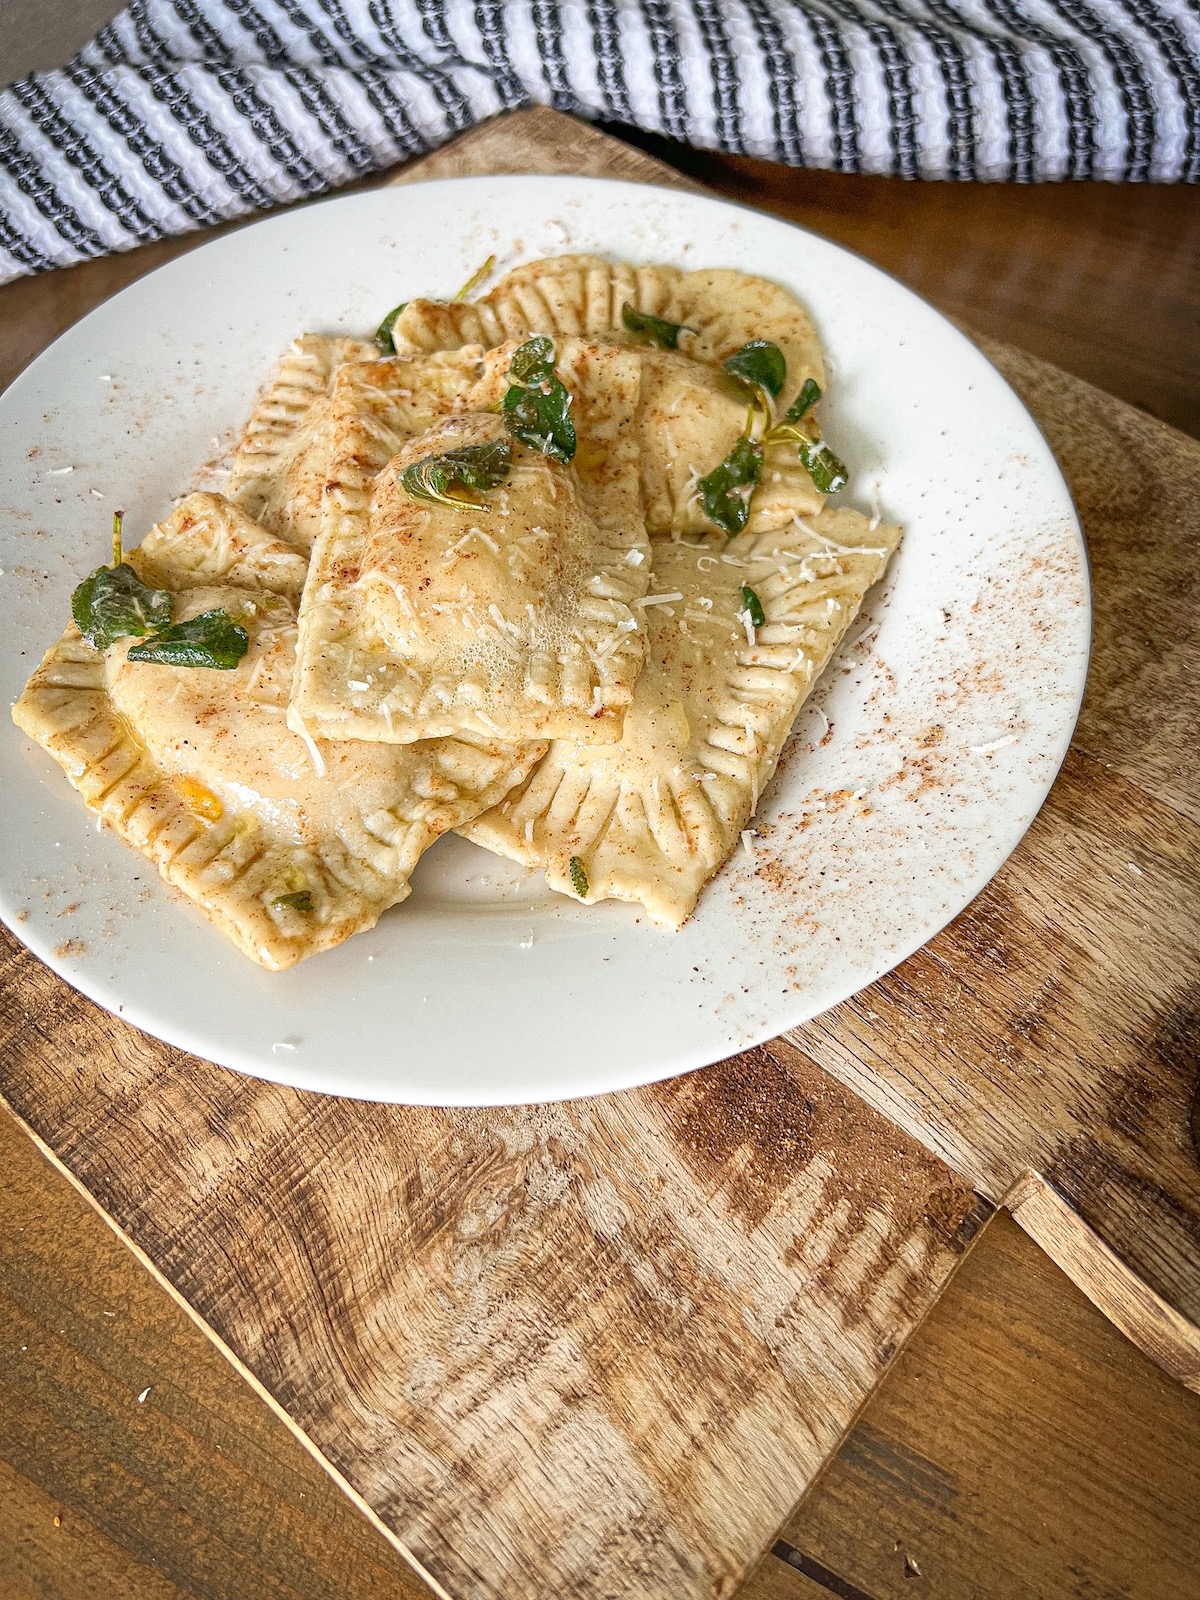
THAT’S IT!! Enjoy this savory, insanely delicious, jump-off-the-roof fantastic dish.
Note: Depending on the size of your butternut squash you will have a lot of filling leftover – make this again the next night (like I did,) but also make more raviolis and FREEZE these puppies! I am using the leftover butternut squash filling to make more, and then am freezing them so I can eat them on Thanksgiving.
These are so cheap to make – just take a look at the ingredient list – and if you grow your own butternut squash, it’s even cheaper. Win-win all around!
Frequently Asked Questions
Question: My dough is sticky! What do I do?
Answer: If your dough is sticking to your fingers, add a few tablespoons of flour and knead it for a few seconds. Remember, it’s always easier to fix dough when it’s too sticky vs. too dry, because you can always add flour, but not take it out. So just be sure to add it in little by little until your dough is workable and not sticky, but moist enough that it’s not cracking.
Question: My dough is dry and cracking. How do I fix it?
Answer: Don’t panic. If your dough is a little too dry and maybe even cracking, there are some things you can do. If it’s just a bit too dry, you can wet your hands with a little water and knead the dough a bit, which might help. If it’s still too dry, you can add water in by the teaspoon. If you found you went a little too overboard with the water, balance it out by adding a small bit of flour.
Question: I’m trying to seal the ravioli and some filling is spilling out. What do I do?
Answer: you probably added a bit too much filling. It happens! Just remove a bit of filling and try to re-seal it. If you are finding the dough is too wet or sticky, add a sprinkle of flour, and try again.
Question: A hole formed in the top of the ravioli dough when I was sealing it. How do I fix it?
Answer: Again, don’t panic! I like to make what I call a “pasta patch.” Just roll out a very small piece of thin dough, wet the bottom with a bit of egg wash, and place it over the hole to “patch” it. I said it before, and I’ll say it again: life isn’t perfect, and your pasta doesn’t have to be, either! 😉
Question: I have a lot of leftover filling. What can I do with it?
Answer: You can either store it in your refrigerator for up to 5 days if you plan on making more of these, or store it in your freezer for up to 3 months. To defrost, just transfer to your refrigerator for a day to thaw, and use again. You can also make extra dough so you can make two batches of these at once, which I like to do! Then you can freeze the ravioli and just boil them from frozen when you’re ready to cook it again.
Question: Can I freeze the ravioli?
Answer: Yes! I love making extra dough so I can make two batches at once, and then I freeze the extra batch before cooking for a later date. To freeze, lay them out on a cooking sheet lined with parchment, and pop them in the freezer for a few hours. Then, once frozen, transfer to a freezer bag. When ready to enjoy, you can boil straight from frozen.
Lastly…
If you love gluten-free pasta recipes for fall, try my Sweet Potato Gnocchi. And if you love gluten-free pumpkin recipes for fall try my Fall Spice Cake, or my Paleo Pumpkin Muffins. And if you made this recipe, let me know how you liked it in the comments!
Gluten-Free Butternut Squash Ravioli With Butter Sage Sauce
20
ravioli (about 4 servings)10
minutes50
minutesKeep the screen of your device on
Ingredients
- For the ravioli filling
2 small – medium sized butternut squashes
1/4 cup extra virgin olive oil
1 15 oz. container of ricotta or dairy-free ricotta (see note)
4 gluten-free almond cookies, almond meringues, or amaretti cookies
1/2 tsp. sea salt
1/4 tsp. black pepper
- For the dough
2 cups gluten-free flour (I like the Namaste brand), plus extra, for dusting
5 large eggs (4 for the dough, one for egg wash)
1 drizzle extra virgin olive oil
1 large egg, mixed with 1/4 cup of water (this is your egg wash)
- for the butter sage sauce
1/2 stick unsalted butter, or 1/2 cup ghee or olive oil (see note)
handful fresh sage leaves (about 1/2 cup)
- Optional garnish
grated cheese
sprinkle of cinnamon or nutmeg
Directions
- Preheat your oven to 350 degrees. Prepare your butternut squashes by cutting off the tops and bottoms, then standing them upright and slicing them down the center. (Tip: If your squash is particularly hard, you can insert the knife and then gently use a kitchen mallet or hammer to tap it down until you reach the bottom.) Use a spoon to scoop out the seeds. Place your squash halves on a cooking sheet or baking dish, skin side down. Season with salt, pepper, and a drizzle of extra virgin olive oil. Bake for 45-55 minutes, or until you can insert a spoon in the flesh easily. Set aside and allow to cool.
- While the squash is baking, start on the dough. Place the flour, eggs, and drizzle of olive oil into a food processor. If your processor came with a dough hook, use that; if not, the regular food processor is fine. Process for 30 seconds. Remove the top and use your hands to gently touch the dough; if it sticks to your fingers, it’s not ready. Add about 4 heaping tablespoons of additional flour, and process again for 30 seconds. Your dough may form into a ball on its own, which is great. Check it again, and once you can handle the dough without it sticking to your hands, it’s ready.
- Add a bit of flour to a clean surface. Remove the dough from the processor and place it on the surface. Use your hands to break it apart and form 6 (roughly) equal-sized round balls. Take one of the balls and work it into an oblong shape, then use a rolling pin to roll up and down the dough until you get a nice strip, about 12-15 inches in length and about 3 inches wide. Set aside, and repeat this process with each of the other dough balls.
Tip: you can stack these and place a damp paper towel in between sheets, which will keep them from drying out as you prepare your filling. - Your squash have likely cooled by now. Scoop out the flesh from the squash into a large bowl. Add the ricotta, then crumble the cookies right into the bowl. Add the salt and pepper, then stir until it’s all combined well.
- Lay one of your dough strips onto the surface of your workspace. Use a pastry brush to brush the egg wash onto the strip. Begin to spoon filling by the teaspoon down the strip, leaving about 1 inch in between. (You should get about 6 teaspoons onto the strip.) Then, cover evenly with another strip of dough, pressing down gently in between the filling. Gently sprinkle a bit more flour to the top, then use a pizza cutter to separate your ravioli. Repeat with other strips until you are out of dough.
- Now it’s time to seal your ravioli. Using a fork, work your way around the edges of each ravioli gently pressing down to “seal” them shut. Stack them on a dish separated the layers with parchment paper, then place in the refrigerator for 20 minutes or the freezer for 10 minutes.
- Fill a medium pot of water and set over medium heat. While you’re waiting for the water to boil, prepare your butter sage sauce. Place a skillet over medium-high heat and add your butter. After about 5 minutes, you will begin to see golden-brown flecks in the butter. Turn off the heat and add your sage leaves, which should crisp up nicely.
- As soon as your water is boiling you can drop your ravioli in. Gently stir with a wooden spoon, careful not to break them. Stay on top of these; once they begin to float (about 3-5 minutes), get them out and transfer them with a slotted spoon to your butter sage sauce (see note if using ghee). Careful toss with the wooden spoon until the ravioli are coated with the sauce. Transfer to plates, and top with grated cheese and cinnamon or nutmeg (optional). Buon appetito!
Notes
- It takes 45 minutes to roast the squash, but the raviolis only need about 3-5 minutes to cook.
- If you choose to use dairy-free ricotta you can use any store-bought brand, or use my Two Ingredient Cashew Ricotta
- You can use ghee instead of butter, or even olive oil; just know that they will not “brown” like butter does, and won’t make those tiny golden flecks. This is perfectly fine. Just heat it on the stovetop and add the sage leaves as instructed.
- If you’re having trouble with the dough, see the FAQ section for fixes.
Did you make this recipe?
Tag @missp290 on Instagram and hashtag it with
Like this recipe?
Follow @alessandramac on Pinterest
Join our Facebook Group!
Follow us on Facebook


Wow, this looks delicious!! Can’t wait to try it out.
Thanks Lori!! They are delish. I am making more to freeze them because I have so much leftover butternut squash mix, and I’m going to make these on Thanksgiving too.
sorry I rarely if ever have posted a comment but your blog was so full of GREAT humour and so self deprecating (look that up will ya?) I loved it – let alone the ravioli – which I just made (but have not eaten yet – thanks for a great post 😀
Welcome to the comments! Thanks for posting 🙂 So glad you found this entertaining, and that you made the ravs! I hope you enjoyed them and found them as worth it as I did, and please continue to stop by!
I see you dont knead the dough, is that right? I made some using another recipe (rick stein) and they were tough as though not cooked but I did leave them to boil for 3 min….help
‘@Carann, yes, that is correct and is one of the things I love about this recipe (although it could be a great arm workout, HA). The food processor does that work for you, so no need to knead.
Two most important things about the recipe is making sure the dough is a good consistency (not too dry and not too sticky), and that you take them out of the boiling water at the right time. They cook fast, so as soon as those suckers start floating, get them out of there 😉