First married Christmas tradition: Save the pine needles from your first Christmas tree together in a beautiful keepsake pouch, to put out for years to come!
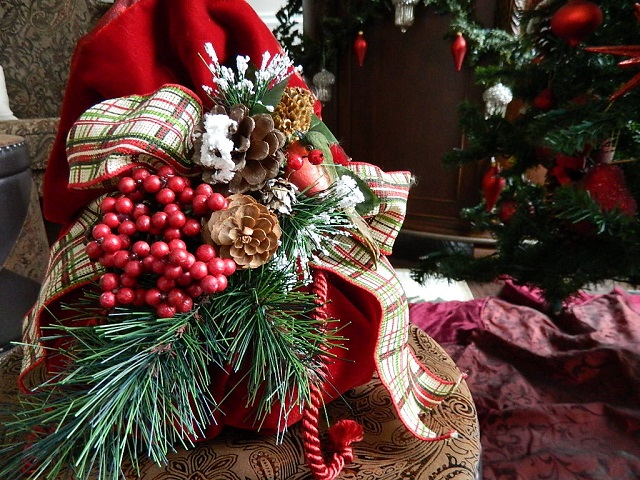
You may remember last month when I blogged about the beautiful velvet pouch my mother-in-law gave us, filled with the pine needles from our first Christmas tree in our new home. We now have this pouch as a keepsake to put out every year on Christmas along with the rest of our decorations. It was such a cool way to remember or first Christmas together in our new home, and it also serves well as a keepsake for your first married Christmas together.
So many people loved this idea, so as promised, here is the DIY instructions for making your very own! You can make one for yourself, but it’s also a great gift to give for a newly married couple, a couple who just purchased a new home, a couple who had their first baby, or the lesbian couple down the street who is spending their first holiday out of the closet. The possibilities are endless. It is a festive “holiday pouch” (not to be confused with a holiday pooch, which is something we don’t want to be left with once the holidays have come and gone.)
The bag requires very easy-level, minimal sewing. Don’t worry, it’s not difficult. And in the words of Martha Stewart: “If I can do it, you can do it.” What’s that you say? You can’t sew to save your life, but you REALLY want one of these bags? Fear not: simply comment on this post telling me why you want the pouch, and I will choose one lucky winner and send you your very own as a freebie! It’s that simple! For those ready to tackle the DIY, just read on. And send me your pics of what yours looks like!
Materials:
1 yard of fabric for the outside of pouch*
1 yard of fabric for the inside of pouch
1 sheet of craft batting
1 spool of ribbon
1 or 2 festive sprigs
scissors
1 rubber band
sewing machine and thread
some of the pine needles off of your tree
Here, you can see what I was working with:

*You can see from the picture that you want the fabric for the outside of your pouch to be slightly different from the fabric that will line the inside of your pouch. For this bag, I used velvet on the outside, and satin on the inside. Also, for beginner sewers (myself included,) keep in mind that one yard of fabric will run 36 inches wide of course, but the height will vary. In my case, the height is 32 inches. My mother-in-law explained to me that even though the inner fabric (the liner) needs to be 36 inches wide, it only needs to be half the height of the outer fabric.
Step 1: Place your two pieces of fabric one on top of the other, good sides facing together. Run a stitch along the side that is 36 inches in length. Remember: it doesn’t need to be pretty – this part will be on the inside of your bag, out of sight.

Step 2: Once the stitch is sewn, open the fabric up so you now have one big piece. (You will see from the pic below that here is where I cut my inner fabric.) Now, take one side and fold it over onto the other side. (*Note: make sure that the ugly side of the stitching is facing out.)

Again, make sure the ugly side of the stitch is to the outside. Why did I say this twice? Because I messed this one up the first time, of course 😉
Step 3: Now sew a stitch along the side running all the way down.

Step 4: Bunch up the bottom, and tie a rubber band around it. This will become the inside of the bottom of your bag. Again, it doesn’t have to be pretty!

Step 5: Reach your hand inside, and turn the bag inside out. Tuck the liner inside. At this point, your bag should look something like this:

Step 6: Now for the fun part! Put your layer of batting down inside the bag, and fill your pouch with your leftover pine needles from your tree. (Note: the smell of the needles will actually last a very long time, but you can also put some holiday-scented potpourri in the bag along with them.) Once your bag is full, tie the ribbon around the bag to close it up.
Step 7: Tuck your sprig inside the ribbon, then wrap the stem around where the bag is closed. Play around with it so that the sprig is under the ribbon and out of sight.

There you have it! You now have your festive tree bag to put out every year! You can add a little tag if you like also, with your names and the year, to add a custom touch. Enjoy, and remember, if you want to win a free bag, drop a comment on this post and tell me why you should win! The winner will be chosen next week! I will send you the custom bag with all of the materials, so all you’d need to do is fill it with your pine needles and tie a ribbon around it.
I hope you enjoyed this tutorial…thanks for stopping by!

Am I allowed to enter to win, or are family members excluded? 😉 I love this bag idea!! Thanks for the tutorial! Hugs and kisses, miss you!!
~Michelle
‘@Littlemissdaisy Hi Michelle! Of course! No family discrimination here 😉 Miss you too!!
So, the reasons why I want the pouch:
1. A keepsake of our first Christmas in our “new home”
2. It would also be a keepsake of the girls first christmas (well older daughters 2nd Christmas…but close enough)
2. Every Christmas when we look at it, we’ll always think of cousin Ali 😀
3. Oh, and I can’t sew for the life of me!
‘@Littlemissdaisy I love it!! Your odds are looking pretty good right now!!! LOL!
Wow Ali this turned out beautifully! It’s funny that I happened to call you right as you were trying to figure out the mechanics of how to sew it together haha I’m glad it turned out easier than you thought! I don’t think I’ll be attempting it any time soon due to…well geez I sometimes have trouble finding time for a shower (haha)…but definitely love the idea and would most likely buy one to hand for it’s beauty and smell during the holidays!
Wow Ali this turned out beautifully! It’s funny that I happened to call you right as you were trying to figure out the mechanics of how to sew it together haha I’m glad it turned out easier than you thought! I don’t think I’ll be attempting it any time soon due to…well geez I sometimes have trouble finding time for a shower (haha)…but definitely love the idea and would most likely buy one to hang/place for it’s beauty and smell during the holidays!
‘@rshin Thanks Rula! Yeah it turned out to not be so bad!! 🙂
Apr21Caroline Hi there I’ve been reading for awlhie now. You have such a nice blog, and I’m really motivated to actually follow through with my ideas after seeing the things that you’ve made. I had to make a pouch like this after seeing this one. It’s such a simple idea, but the bright zipper really packs a punch! Thanks for the inspiration.
Thanks you so much Claudia! I’m glad I could give some inspiration. That is awesome that you made a pouch too! If you aren’t on the mailing list, definitely sign up – sometimes I have things in the newsletter that are not on here so you won’t miss anything. Glad you found me here!
My husband and I would love something like this. He’s a Christmas fanatic!! We’d love something like this to start a tradition of our own! 🙂
catherinepwoodyou should!! We missed doing it on our first Christmas being married, but we started it when we bought our home and spent our first Christmas there. My MIL made the bag for us and it was her idea. I love it! Keep me posted if you make one!